This post describe how to deploy a Video On Demand Streaming server. Using Kaltura’s nginx vod module which can stream video file (mp4) to many other wrapper such as DASH, HDS, HLS, MSS. Other functions can also be added such as authentication, multi-bitrate streaming, subtitle insertion, thumbnail generation, etc.
Prepare the server and install the required program
In this example, I’ll use Ubuntu Linux on Amazon EC2 and run the following command
sudo apt update && sudo apt upgrade -y

sudo apt install curl build-essential libssl-dev zlib1g-dev linux-generic linux-headers-$(uname -r) libpcre3 libpcre3-dev ffmpeg libavcodec-dev libavformat-dev libswscale-dev -y
Install Nginx and related modules
We will start installing Nginx by building with modules as follows:
- Kaltura’s vod module is the main module using to create on-the-fly repackaging mp4 video
- Akamai token validation module for validate token in video url (for authentication)
- Secure token module for url token generation
Start by create folders for files we’re about to download
mkdir nginx nginx-vod-module nginx-akamai-token-validate-module nginx-secure-token-moduleThe download and extract Nginx and module files
curl -sL https://nginx.org/download/nginx-1.16.1.tar.gz | tar -C /home/ubuntu/nginx --strip 1 -xz
curl -sL https://github.com/kaltura/nginx-vod-module/archive/399e1a0ecb5b0007df3a627fa8b03628fc922d5e.tar.gz | tar -C /home/ubuntu/nginx-vod-module --strip 1 -xz
curl -sL https://github.com/kaltura/nginx-akamai-token-validate-module/archive/1.1.tar.gz | tar -C /home/ubuntu/nginx-akamai-token-validate-module --strip 1 -xz
curl -sL https://github.com/kaltura/nginx-secure-token-module/archive/1.4.tar.gz | tar -C /home/ubuntu/nginx-secure-token-module --strip 1 -xz
Run installation command: configure, make and make install
cd nginx

./configure --prefix=/usr/local/nginx \
	--add-module=../nginx-vod-module \
	--add-module=../nginx-akamai-token-validate-module \
	--add-module=../nginx-secure-token-module \
	--with-http_ssl_module \
	--with-file-aio \
	--with-threads \
	--with-cc-opt="-O3"

sudo make
sudo make install

sudo rm -rf /usr/local/nginx/html /usr/local/nginx/conf/*.default
Then we start Nginx with command:
sudo /usr/local/nginx/sbin/nginxNow we can test Nginx installation by navigate to server’s IP address. If Nginx install correctly we’ll see “Error 404 Not Found” page (because we haven’t create any index file yet)

Configure the Nginx server and modules
After successfully installing Nginx, we need to set up the nginx.conf file to act as streaming server. Start by creating files to / usr / local / nginx where
sudo vi /usr/local/nginx/conf/nginx.confWhich we will set the server to:
- Play mp4 files from a folder on the server (local file system).
- Output formatted in HLS.
- Able to create thumbnails as image from the video to preview.
- Can be secured with a token generated from an endpoint program using a preset random hex key (generate random hex using a tool such as browserling tools/random-hex)
Full nginx.conf file as follow:
worker_processes  auto;
user ubuntu;
pid /run/nginx.pid;

events {
	use epoll;
}

http {
	log_format  main  '$remote_addr $remote_user [$time_local] "$request" '
		'$status "$http_referer" "$http_user_agent"';

	access_log  /home/ubuntu/nginx.log  main;
	error_log   stderr debug;

	default_type  application/octet-stream;
	include       /usr/local/nginx/conf/mime.types;

	sendfile    on;
	tcp_nopush  on;
	tcp_nodelay on;

	vod_mode                           local;
	vod_metadata_cache                 metadata_cache 16m;
	vod_response_cache                 response_cache 512m;
	vod_last_modified_types            *;
	vod_segment_duration               9000;
	vod_align_segments_to_key_frames   on;
	vod_dash_fragment_file_name_prefix "segment";
	vod_hls_segment_file_name_prefix   "segment";

	vod_manifest_segment_durations_mode accurate;

	open_file_cache          max=1000 inactive=5m;
	open_file_cache_valid    2m;
	open_file_cache_min_uses 1;
	open_file_cache_errors   on;

	aio on;

	secure_token_akamai $secure_token {
		key RANDOM_HEX;
		acl "$secure_token_baseuri_comma*";
		param_name token;
	}

	server {
		listen 80;
		server_name localhost;
		root /home/ubuntu;

		location ~ ^/videos/.+$ {
			autoindex on;
		}

		location /hls/ {
			vod hls;
			alias /home/ubuntu/videos/;

			if ($arg_token) {
			  set $input_token $arg_token;
			}

			add_header Access-Control-Allow-Headers '*';
			add_header Access-Control-Allow-Origin '*';
			add_header Access-Control-Allow-Methods 'GET, HEAD, OPTIONS';

			akamai_token_validate $input_token;
			akamai_token_validate_key RANDOM_HEX;

			secure_token $secure_token;
			secure_token_types application/vnd.apple.mpegurl;
			secure_token_expires_time 100d;
			secure_token_query_token_expires_time 1h;
		}

		location /thumb/ {
			vod thumb;
			alias /home/ubuntu/videos/;
			add_header Access-Control-Allow-Headers '*';
			add_header Access-Control-Allow-Origin '*';
			add_header Access-Control-Allow-Methods 'GET, HEAD, OPTIONS';
		}
	}
}
Which will have to modify the data according to the values that we want to use, including
- RANDOM_HEX must be re-generated from tools such as browserling tools/random-hex
- The alias value in location /hls/ and /thumb/ matches the folder in which the video files are stored.
- Other values such as location of access_log and error_log files.
After configure, Nginx needs to be reloaded using command
/usr/local/nginx/sbin/nginx -s reloadTesting
To be able to test video streaming, we’ll need to put a video file into the folder set as alias in the location set in the nginx.conf file. For example, put video file at /home/ubuntu/videos/video.mp4
Test video thumbnail
To view thumbnail image of the video, navigate to urlhttp://YOUR_IP/thumb/video.mp4/thumb-300.jpg
The number after the thumb- is the time in the video that you want to capture. If it works normally, it will show a picture from the video at that time.
Test video streaming
The video test is performed using a program that can view video streaming, here we uses VLC media player, but because this video is secured by token, we need to generate a token URL first. By using tools such as matricali/php-edge-auth.
The token generated will have an actual token and expired time such as exp=1553295434~acl=%2f*~hmac=5a6253*******9d5cbe73
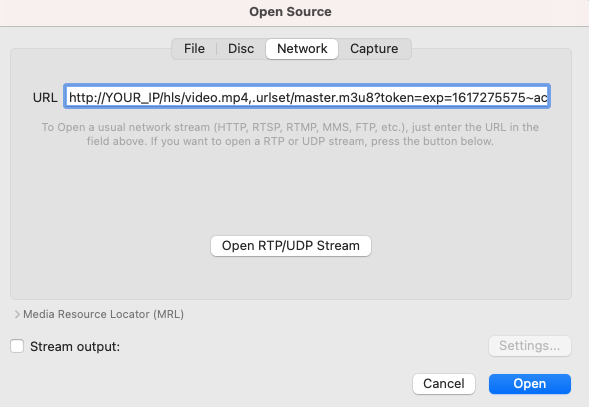
Append it to the end of the video url as followshttp://YOUR_IP/hls/video.mp4,.urlset/master.m3u8?token=exp=1553295434~acl=%2f*~hmac=5a6253*******9d5cbe73
Now we can open the URL in VLC by going to File> Open Network and entering the full URL to open

If everything work, VLC will play the video file.
Note: When installing Nginx using the above method (manually build) Nginx will not automatically launch after server restart. You can set it to launch automatically by creating a systemd service. See post: Nginx as Systemd service in Ubuntu